Sunday 16 December 2018

PIZZA PASTA CAKE


PIZZA PASTA CAKE


INTRODUCTION:

The roots of Pasta can be found in Ancient Italian History, corresponding to the areas of Tuscany, Umbria, and Lazio roughly about 700 BC. 

They prepared a wheat and egg paste, but it was baked not boiled. There are artifacts from a period 3,000 years ago that look remarkably like pasta dies. 


The ancient Greeks had some form of flattened dough that resembles lasagna. The knowledge to mix wheat and egg with water was known long before. But the result was roasted on hot stones. We could name it as the coarse style of baking or slowly come towards it. The Romans quickly followed suit in the 1st century AD with a layered dish comprised of 'lasagna' and meat or fish.

By the 5th century AD, cooking noodles was a common practice, But a more interesting aspect of its origin is that there are witnesses of its migration from the Arab World. This record of Pasta like preparation in the Arab world provides a basis that the practice spread to Italy from Arabia. With the incursion of Arabs into Sicily, they would undoubtedly have brought a food that could travel well. A flour-based product in the shape of strings was produced in Palermo at the time that might fit the bill.

Whatever the claims are for the origin of Pasta, it became more popular during the 14th century and by the 17th century, it was a common food throughout the region. Pasta really took off in America around the turn of the century. Spaghetti, lasagna and many other forms became widespread as a result. With the ubiquitous consumption of pre-made dried macaroni and cheese during WWII, the dish became a staple of the American diet for decades after.

But whatever its true origins, and subsequent history, one thing is sure. Pasta is here to stay. 

Pasta has changed so little over the thousands of years that it has been made and consumed. While the ancient Greeks and Romans undoubtedly made and prepared pasta differently than is done now. 

Any food which can satisfy and remain relatively unchanged for 500 years surely has some remarkable properties. Made from simple ingredients - wheat and eggs - and processed in a simple way - just basic mixing - are just two reasons, but fundamental ones. Healthy, appetizing and easy to prepare by simply boiling or baking. 

The many shapes and sizes of pasta aren't just a modern marketing gimmick, either. They serve a good purpose. Providing lots of surface area on this starchy food allows sauces to cling well. Coming in a variety of useful shapes means the ability to stuff, layer or otherwise offer versatility in recipe invention.

Pasta, almost alone among foods, goes well with a huge variety of other ingredients. The range of compatible sauces, very simple Marinara is not found in other foods. 

Pasta is a very healthy food, too. Despite its reputation, pasta is a low-calorie, heart-beneficial dish. With only 200 calories per cup (two servings) and a gram of fat, it is perfect even for those on a strict diet.

As a complex carbohydrate, it is digested slowly, leading to an even and gradual production of blood sugar. As a food high in fiber, there is evidence that it is helpful in forestalling intestinal and other cancers. Often fortified with folates and naturally packed with essential minerals, it is heart-healthy, as well.

It's easy to prepare, easy to cook and makes for a great presentation on the table. There's a good reason so many Italian restaurants continue to do good business. But it's equally welcomed at home where it can inexpensively feed a family of five or a party of fifty.
But one thing about pasta has changed dramatically over the centuries. There is today more helpful tools and machines to create and prepare pasta than ever before. The variety and utility of rollers, cutters, bowls and other tools are greater than ever. Materials science and ergonomic designs have made these things stronger, healthier and less expensive. Pasta making machines are cheaper, more reliable and come with a larger assortment of useful attachments than they did even as recently as twenty years ago.
So when you think of pasta, you don't need to think of a "food you really shouldn't eat" or one that is just mundane. It's healthy, can be prepared in a dazzling array of tasty dishes, and is just plain great.


EQUATION:

YIELD:                                                      6-8 Servings

Boiling and Sauce making time:                 30 Minutes
Assembling in Baking Dish:                        20 Minutes
Baking Time:                                            30 Minutes
Total Time:                                               80 Minutes
Expenses:                                                 800 Rupees (About 7 US Dollars)                                             

WHAT WE NEED FOR OUR PIZZA PASTA CAKE:

  1. 500 Gram Penne Pasta
  2. 2 Tablespoons Olive Oil
  3. 500 Grams Beef or Chicken Mince (finely grounded)
  4. 1 Large Capsicum
  5. 2 Carrots
  6. 2 medium Carrots
  7. 3 Cloves Garlic
  8. 2 Cups Spicy Pizza Sauce (See my recipe on this blog)
  9. 1 Cup Mozzarella Cheese
  10. 1 Cup Parmesan Cheese
  11. 2 Green Chillies chopped
  12. Salt & Black Pepper to taste
  13. 2 Tablespoons Butter
  14. 2 Large Bread Slices


HOW WE'LL MAKE OUR CAKE:


  • Boil pasta in a large cooking pot with salt until slightly under-boiled (12 to14 minutes). Use a large pot so the pasta doesn't stick together. When done, rinse them in cold water and drain again. 
  • Toss pasta with 1 Tablespoon olive oil for coating. 
  • Drizzle the oiled Pasta with some Parmesan Cheese and set aside.


  • Now cook the Minced meat with spices and tomatoes as given above in one Tablespoon of remaining Olive Oil.  (You can change the spices according to your taste). 
  • Take out half of the cooked meat and blend it to make a paste or meat sauce
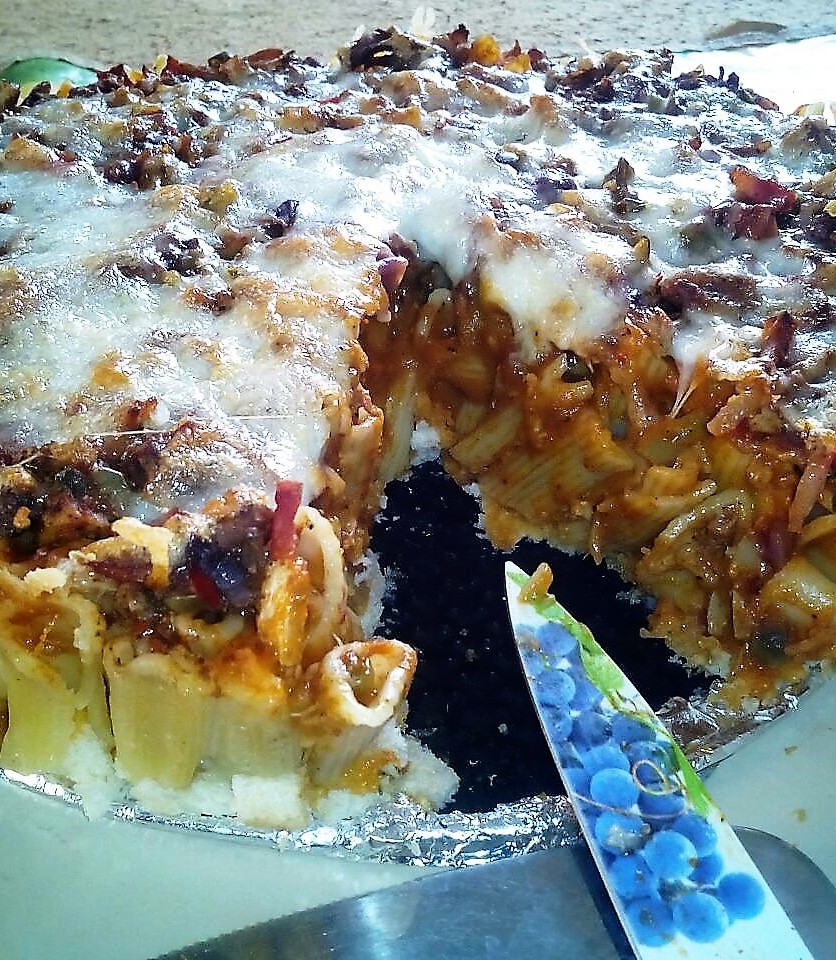
  • The filling is ready. Set aside. (I am sorry that the picture does not show the meat sauce)
  • Break the Bread slices into small pieces.
  • Preheat Oven to 200 C, 400 F or Gas Mark 4 for 20 minutes.


  • Fix Silver Foil on bottom sides of the Springform pan, so that it may not leak while being baked. (As shown in the picture) Most Springform Pans do leak.


  • Grease a 9-inch Springform baking pan and lay a layer of bread pieces at the bottom of the pan.


  • Pour Pizza Sauce over the above layer of bread pieces.
  • Now comes the trickiest part of the whole process which is fitting or filling the pasta pieces in a standing position in the baking pan over bread pieces and Pizza Sauce.
  • It will take time and a lot of patience as well as a little messy for your fingers.
  • Try fitting the pasta pieces in standing position, the soiled bread pieces will help its fixing.
  • Sprinkle some Parmesan Cheese over the Pasta


  • Now pour the Mince Sauce over the standing Pasta and fill their holes. Of course, it will take some time to fill all the pieces with the sauce but your efforts will result in ooohs and aaaahs of all. Stuffing meat sauce in each hole is not an easy task but doing it will give you satisfaction as well as the admiration of family and friends who'll be lucky to see your creation.


  • Place the pan into the Oven and bake for 15 minutes
  • Take it out of the Oven and generously drizzle grated Mozzarella Cheese on top.
  • Bake again for 12-15 minutes more or till the Cheese turns golden


  • Cool it on a wire rack for at least 15 minutes.
  • Run a knife on sides and place a straight bottomed plate on top of the Bundt Pan and invert it. The Pizza Pasta Cake will easily slide onto the plate.


  • Cut the slices in the same way as you cut the conventional cake and serve with any sauce you like.


How is it? 

Hope you like this Cake, the effort put in assembling of the Cake is worth its novel taste, the mixture of Pizza and Pasta in shape of a conventional cake.

Get on with it and make this cake at your earliest, also remember to call your friends and unveil the Cake Pan filled with Cheesy Pasta with the taste of Pizza at the same time without any FEAR OF FAILURE.


InshaALLAH our next recipe will be


Thanks,


NOVICE

Monday 19 November 2018

VEG LOAF


VEG  LOAF


EQUATION:

Preparation time:                                15-20 Minutes
Baking Time:                                        25 Minutes
Baking Temperature:                            180C, 350F or Gas Mark 3
Yield:                                                   One 9 by 5-inch Loaf Tin)
Expenses:                                             Rupees75 Only (Less than a US Dollar)


INGREDIENTS:

  1. 3 Cups Mashed Potatoes
  2. 1 Cup Boiled Green Peas
  3. 1 Tablespoon Butter
  4. 2 Eggs
  5. 1 Teaspoon Black Pepper
  6. Salt to taste
  7. 1 Tablespoon Soy Sauce
  8. ! Tablespoon Green Chili Paste
  9. 2 Cheese Slices


METHOD:

  • Boil separately Potatoes and Green Peas with a pinch of Salt and set aside.
  • Mash the boiled Potatoes with One teaspoon of coarsely Grounded Black Pepper 
  • Stir-fry Green Peas with butter for a minute
  • Mix Soy Sauce and half of the Green Chilli paste, stir and douse the flame
  • Preheat Oven to 180 C, 350 F or Gas Mark 4 for 20 minutes
  • Grease the Loaf Tin and adjust butter paper at the bottom as well as sides
  • The Butter Paper on sides in a manner that the paper is one or two inches above the walls, this will help take out the baked dish by picking it up with the flaps of butter paper.
  • Place a layer of Mashed Potatoes at the bottom of the dish, the thickness depends on your choice.
  • Put on the Green Peas layer above the Potatoes
  • Sprinkle Grounded Black Pepper and Green Chilli Paste over the Peas
  • Repeat this process once again
  • Make two dents of about 2 inches diameter on the Peas for Eggs
  • Break Eggs and place them in the dents
  • Break Cheese Slices and set them along with the eggs
  • Bake for 25-30 minutes or till the pieces of Cheese turn golden
  • Cool on the Wire Rack for 15 Minutes and take it out with the help of extra butter paper, place it on a platter and enjoy semi-hot or warm, or if you like fully hot, then use forks and spoons directly in the baking pan.
  • Serve with Chilli Garlic Sauce or my ALL PURPOSE SPECIAL CHUTNEY. (Find the recipe in the previous pages)


Hope you like this Veg Loaf for supper or include it in your dinner Menu and will prepare it yourself without any FEAR OF FAILURE.


INSHA ALLAH the recipe of COCOANUT FUNFETTI CUPCAKES  
will be posted for you.


Thanks,


NOVICE

Wednesday 10 October 2018

COCOANUT FUNFETTI CAKE


COCOANUT FUNFETTI CAKE


EQUATION:

Preparation of Batter:         15 Minutes
Baking Time:                       45 Minutes
Baking Temperature:           180 C, 350 F or Gas Mark 3
Expenses:                            Rupees 400 (3 US Dollars)
Yield:                                  One Nine Inch Bundt Pan Cake, sufficient for 8-10 persons.


WHAT WE REQUIRE: 

  1. 3-1/4 Cups All-purpose Flour
  2. 1/2 Cup Corn Flour
  3. 1 Cup Butter or Coconut Oil (any other vegetable oil can also be used)
  4. 2 Cups Sugar
  5. 1 Packet Egg Pudding Mix
  6. 6 large Eggs
  7. 1-1/2 Cups Coconut Milk
  8. 2 Cups Desiccated/grated Coconut
  9. 1/4 Cup Rainbow Sprinkles (Jimmy's)
  10. 2 Teaspoons Baking Powder
  11. 1 Teaspoon Salt
  12. 1 Teaspoon Coconut Extract


FOR GLAZE:

  1. 1/4 Cup Coconut Milk
  2. 1 Cup Powdered Sugar
  3. 1/2 Cup Toasted Coconut Flakes (Optional)


PREPARATION:

  • Pre-heat Oven to 180 C, 350 F or Gas mark 4 for 20 minutes.
  • Grease and Flour the Pan (First smear the butter or oil on the bottom and sides of the pan and then sprinkle Flour over it and tap it to avoid extra flour)
  • In a wide bowl, sieve together the Flour, Corn Flour, Baking Powder and Salt and set it aside.
  • Beat Butter or Oil and Sugar till becoming creamy.
  • Now Add Eggs one by one in the Sugar mixture and continue beating on low speed
  • Add Coconut Extract and Coconut Milk.
  • Add dry ingredient mixture to the liquid mixture and fold it gently, also add the desiccated coconut at the same time
  • Pour the batter in the Cake Pan and bake it for 45-50 minutes.
  • Check by inserting a knife or a toothpick in the center of the cake and if it comes out a little wet then it means the cake is perfectly baked.
  • Don't wait for the knife or toothpick to come out dry and clean, it will make our cake a bit hard and not moist.
  • Please also note that the cake will ease the sides of the pan when fully baked.
  • Take it out and cool it on the Rack for about 20 minutes, feel its temperature and then turn it upside down on any Platter.


FOR GLAZE:

  • Beat the Coconut Milk and Powdered Sugar together and pour this mixture on top of the cake.
  • Cut the desired pieces and enjoy the Tropical taste of Coconut.


Hope this Coconut Cake will become one of your favorite Cake if you throw away any FEAR OF FAILURE.


INSHAALLAH the recipe of Cocoanut Funfetti Cupcakes
will be posted very soon.


Thanks,

NOVICE

Tuesday 28 August 2018

SPICY BBQ CHICKEN CHANAY KI DAL


BBQ CHICKEN CHANEY KI DAL


Hi friends, coming here to share a great dish of traditional and modern flavor in one after celebrating the Eid uz Zuha festival in the Muslim world. Red meat everywhere in abundance must have caused some stomach problems and indigestion as well as carving for some change.  I have made this BBQ Chicken CHANEY KI DAL with spicy tinge for all to savor. Hope you'll love this innovation.


This hot n spicy dish is a mix of BBQ Chicken and Lahori Murgh Cholay. It can be termed as pure Pakistani Lunch and Dinner dish. It's BBQ flavor comes from Coal smoke and chicken with Chaney ki dal cooked like famous Lahori Murgh Cholay.

Here we are going to start preparing our BBQ Chicken CHANE KI DAL with the name of Allah.


THINGS WE SHALL NEED:

  1. 750 grams Chicken
  2. 2 Cups Chane ki Dal (Split Bengal Gram)
  3. 1-1/4 Cups Oil
  4. 2 Medium Onion
  5. 4 Tomatoes250-300 Grams Yogurt 
  6. 1 Tablespoon Cumin seeds (Toasted)
  7. 1 Tablespoon Coriander seeds (Toasted & Grounded)
  8. 1 Tablespoon Red Chili Flakes
  9. 1 Salan Masala (Curry Powder)
  10. 1 Teaspoon Garam Masala Powder (All Spice)
  11. 2 Tablespoon Ginger Garlic Paste (Fresh will be preferred)
  12. 1 Teaspoon Haldi (Turmeric Powder)
  13. 1 Tablespoon Black Pepper Powder
  14. 2 Tablespoon Chat Masala
  15. 1 Tablespoon Chicken Powder
  16. 4 Tablespoon Tomato Ketchup
  17. 4 Green Chilies (Finely Chopped)
  18. Salt to taste
  19. 5-6 Cloves


HOW WE ARE GOING TO MAKE IT:

  • First, we'll marinate the Chicken pieces after washing it thoroughly.
  • In a wide bowl put the Yogurt and beat it like a paste.
  • Add the ingredients from serial number 7 to 19 and mix it.
  • Put all the chicken pieces and cover them with the spiced yogurt paste and refrigerate for a minimum of 2 hours
  • Boil Chane k Dal and hold it before becoming fully tender. Set it aside.
  • After 2 hours heat oil in a wok or a large pan and put cloves and a pinch of salt, stir for a minute.
  • Put sliced onion and cook them to translucent state then add chopped tomatoes till they become tender.
  • Add marinated chicken along with all the remaining paste in the hot oil.
  • Cook it till the chicken is tender and the water dried.
  • Put a Cup of water in chicken, stir it and then add boiled Chane ki Dal.
  • Cook on medium heat till Dal is fully tender and has soaked the spices in it.
  • Douse the flame when the oil comes on the surface.
  • Burn a piece of Coal and put it on a Foil or a small tin or steel utensil, immediately sprinkle some drops of oil over the burning coal and put the lid on the pan with some weight over the top to cover it completely, so that BBQ aroma could not escape.
  • The Coal smoke will give our dish the great BBQ flavor.
  • Garnish it with Green Chilies, Lemon and Julienne cut Ginger and serve hot and smoky.


There shall be NO FEAR OF FAILURE while preparing this or any dish. Remember, this fear will ruin your gastronomical urges.


InshaALLAH our next recipe will be

Thanks,

NOVICE