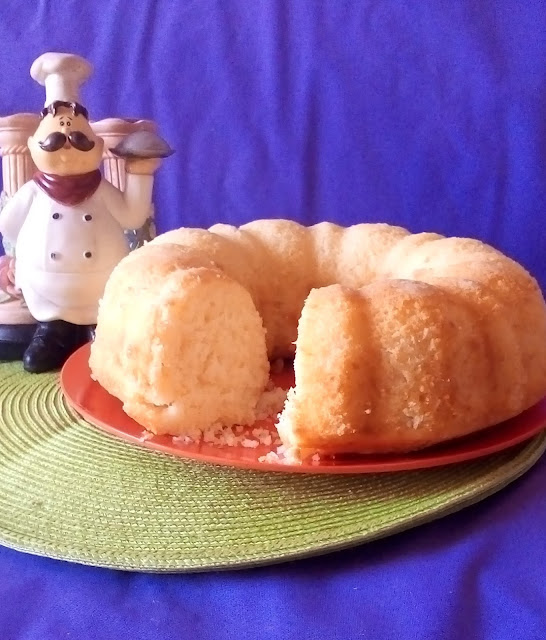
Sunday 30 January 2022

COCONUT BUNDT CAKE


COCOANUT BUNDT CAKE


SOMETHING ABOUT COCONUT


The earliest mention of Coconut is found in "One Thousand and One Nights" story of Sindbad the Sailor. There is also a written record of Coconut in 542 BC. Marco Polo also mentions Coconut in 1280.

The origin of this Plant is now said to be the India-Indonesia region and it float-distributed itself around the World by riding Ocean currents.

Coconut is found mostly in tropical and subtropical areas, it's a pre-historic plant and Scientists believe that it has originated from South Pacific, what we now call New Guinea. 

Coconut Water can be used as a substitute for Blood Plasma. The Meat of this fruit is high in protein, and its milk is very refreshing and sweet. 


Coconut is used in many ways, as a drink, fruit to eat, and oil to cook as well as used in cosmetics, especially for hair treatment. 


Coconut can also be used as Mosquito repellant when its husk is burned and smoke comes out.

Coconut is the fruit of the Palm Tree, it has multipurpose usage and is one of the oldest species used by mankind. It is said that its name came from Portuguese explorers, the sailors of Vasco da Gama, who brought this fruit to Europe from India.

Every part of the Coconut Palm Tree is useful and people have taken full advantage of this gift from ALLAH. It gives Water, Milk, wine, oil, and its milk-white pulp. 

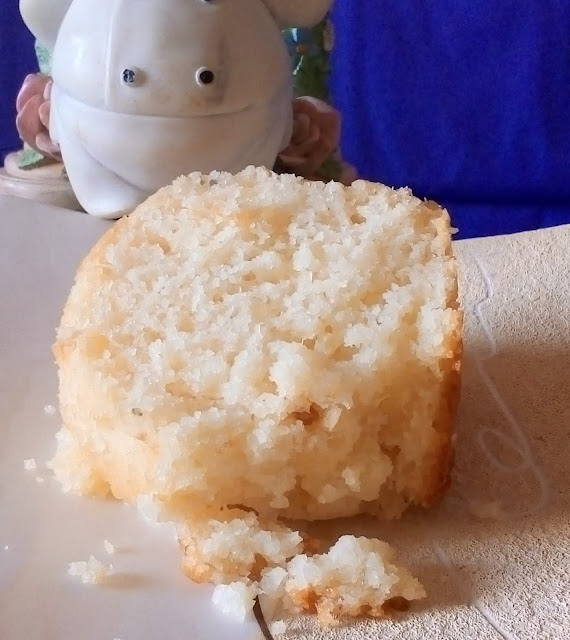
A cake made from Coconut pulp and milk has such a great taste, flavor, and aroma that one can never forget its first bite.


Making a Coconut Cake is not a difficult thing to do, it really is very simple and it tastes great. 

Here is the recipe for my viewers to make and taste this great cake.  I made it in a 9 inch Bundt Pan but you can make it in any pan of that size.

Let us start with the name of ALLAH.


EQUATION:

Baking Temperature:                       180 C, 350 F or Gas Mark 3 
Baking Time:                                   35-40 Minutes
Mixing Time:                                    15-20 Minutes
Expenses:                                        Rupees 250-300 (2 US Dollars)
Yield:                                                One 9 inch Bundt Pan Cake, enough for 9-10


WHAT WE REQUIRE: 

  1. 3-1/4 Cups All-purpose Flour
  2. 1/2 Cup Corn Flour
  3. 1 Cup Butter or Coconut Oil (any other vegetable oil can also be used)
  4. 2 Cups Sugar
  5. 6 large Eggs
  6. 1-1/2 Cups Coconut Milk
  7. 2 Cups Desiccated/grated Coconut
  8. 2 Teaspoons Baking Powder
  9. 1 Teaspoon Salt
  10. 1 Teaspoon Coconut Extract

FOR GLAZE:

  1. 1/4 Cup Coconut Milk
  2. 1 cup Powdered Sugar
  3. 1/2 Cup Toasted Coconut Flakes (Optional)


PREPARATION:

  • Preheat Oven to 180 C, 350 F, or Gas mark 4 for 20 minutes.
  • Grease and Flour the Pan (First smear the butter or oil on the bottom and sides of the pan and then sprinkle Flour over it and tap it to avoid extra flour)
  • In a wide bowl, sieve together the Flour, Corn Flour, Baking Powder, and Salt and set it aside.
  • Beat Butter or Oil and Sugar till becoming creamy.
  • Now Add Eggs one by one to the Sugar mixture and continue beating at a low speed
  • Add Coconut Extract and Coconut Milk.
  • Add dry ingredient mixture to the liquid mixture and fold it gently, also add the desiccated coconut at the same time
  • Pour the batter into the Cake Pan and bake it for 45-50 minutes.
  • Check by inserting a knife or a toothpick in the center of the cake and if it comes out a little moist then it means our cake is perfectly baked.
  • Don't wait for the knife or toothpick to come out dry and clean, it will make our cake a bit hard and not moist.
  • Please also note that the cake will ease the sides of the pan when fully baked.
  • Take it out and cool it on the Rack for about 20 minutes, feel its temperature, and then turn it upside down on any Platter.

FOR GLAZE:

  • Beat the Coconut Milk and Powdered Sugar together and pour this mixture on top of the cake.
  • Cut the desired pieces and enjoy the Tropical taste of Coconut.


Hope this Coconut Cake will become one of your favorite Cakes if you throw away the FEAR OF FAILURE. You only need to concentrate better than before when you start preparing this or any other cake. Just discombobulated the wayward thinking in about failure in your endeavors of working in the kitchen. 

The problem lies in our minds, which are switched off sometimes by ourselves and the only thing stored in it is negativity about everything. It may also be termed as combobulation, where you are in such a disoriented state of mind that you don't accept the reality and think only about how to avoid defeat or failure. This feeling consumes your positive energy and you are left with blankness.

It is nothing really if one fails to achieve the target at the first attempt, failure could work wonders if you are positive and it will help push you for more and more to achieve what you intended. So, please take your failures as booster shots and continue striving to reach the target.

Hope you are positive this time.


Thanks,


Love you all, 

thine eternally,

NOVICE

Saturday 15 January 2022

Mayo Garlic Sauce


MAYO GARLIC SAUCE

(22.12.2021)


An Introduction to Mayonnaise:

Mayonnaise is a wondrous invention of Culinary history. It consists of eggs, vegetable oil, and an acidic liquid, usually vinegar or lemon juice, but in its finished form is nothing like any of those three.

This is true of lots of cooked foods, of course, but mayonnaise isn't heated, just mixed. (Although eggs used in commercial mayonnaise are pasteurized (heated),  to ward off salmonella.) In its mass-produced form, it is a durable source of creamy goodness compiled of a gratifyingly shortlist (for a mass-produced food) of reasonably wholesome ingredients. It must have been a great technological breakthrough in its day.

And surely it was. The standard creation story, as told on the website of mayonnaise market leader Hellman's, is this:

"Mayonnaise is said to be the invention of the French chef of the Duke de Richelieu in 1756. While the duke was defeating the British at Port Mahon, his chef was creating a victory feast that included a sauce made of cream and eggs. When the chef realized that there was no cream in the kitchen, he improvised, substituting olive oil for the cream. A new culinary masterpiece was born, and the chef named it 'Mahonnaise' in honor of the Duke's victory."

Mahon is on the now-Spanish Mediterranean island of Menorca. In 2010, food writer Tom Nealon dismissed this account as "ludicrous" and hypothesized that "salsa mahonesa" had evolved much earlier out of the ancient Mediterranean combination of garlic and olive oil is known variously as allioli, alholi, and aioli:

"Allioli had been around in the first century C.E., but it had always been extremely problematic - coaxing an emulsion out of oil, garlic, and salt is, it is almost universally agreed, nearly impossible. This process had remained a Catalan secret for millennia for just this reason - it could hide in plain sight because it was the culinary equivalent of black magic. What had apparently happened at some point (probably during the Renaissance) was that someone had added an egg and an acid to the recipe. This changed everything - anyone with the simple, if unlikely, instructions could now make this wonderful sauce."

While this blistering debate over the merits of mayonnaise reached its boiling point only in recent decades, controversy has haunted the egg-based sauce from the very beginning. However, originally the disagreement was not about whether the condiment was good or bad, but rather who could claim bragging rights—France or Spain.

One origin story, repeated in countless secondary sources, holds that the condiment was born in 1756 after French forces under the command of Duke de Richelieu laid siege to Port Mahon, on the Mediterranean island of Minorca, now a part of Spain, in the first European battle of the Seven Years’ War. The Duke’s chef, upon finding the island lacked the cream he needed for a righteous victory sauce, invented an egg and oil dressing dubbed mahonnaise for its place of birth. (Another version claims the chef learned the recipe from island residents.)

This creation tale came under assault a couple of generations later from a French gastronome who sniffed that Port Mahon was not exactly known for its haute cuisine. He felt Gallic provenance was more likely, and that the sauce might originally have been called bayonnaise after Bayonne, a town famous across Europe for its succulent hams. Other advocates of French authorship suggested the name came from manier, meaning “to handle,” or moyeu, an old French word for the yolk. By the 1920s, the Spanish were lashing back: a prominent Madrid chef published a pamphlet calling on his countrymen to reject the phony francophone term mayonnaise in favor of salsa mahonesa.

Present day food writer Tom Nealon emphatically endorses the Spanish view. “The fact that mayo doesn’t show up in any of the initial 17th centuries [French] recipe collections … does seem to confirm that the French didn’t have the ‘technology’ for mayonnaise until the 18th century,” he explained. But Andrew Smith, the author of several histories of mayonnaise, is not so sure: “All of the early recipes say, French. I believe it,” he said.

There is no question that the French popularized the sauce. Starting in the very early 19th century, the word mayonnaise (or magnonnaise) began to appear in German and British cookbooks dedicated to French cuisine. Talk of mayo quickly made its way to the United States, often on the lips of migrating French chefs, such that by 1838 the gourmet eatery Delmonico’s in Manhattan was offering both a mayonnaise of lobster and a chicken mayonnaise.

The salad provided the initial beachhead for mayo’s colonization of American cuisine. Beginning in the late 19th century, elite eaters went bonkers for mayo-drenched potato salads, tomato salads, and Waldorf salads, an elegant mélange of apple, celery, walnuts, and mayonnaise. The sauce was terrific for disguising flaws in vegetables, and its superior binding capacity made it a natural for sandwiches—mayo’s second great platform—which took off as a brown-bag lunch staple following the invention of the mechanical bread slicer in the 1920s. By 1923, the great white condiment’s star was rising so fast that President Calvin Coolidge was inspired to tell the press that the one treat he simply could not do without was his Aunt Mary’s heavenly homemade mayonnaise.

I've given here the introduction of one of the main ingredients of Mayo Garlic Sauce, which has now become a worldwide necessity of nearly every fast food, especially for those who are in the market commercially. Preparing your own sauce will give you great satisfaction and I am sure that you'll feel that the homemade Sauce is more healthy and nutritious than the store bought one.

The problem lies with our sedentary style of living, and the availability of everything over the counter, we just drive out to the store and fill our shopping trolley, not knowing how good these commercial products will prove for our elders and kids. Anyway, I must admit here that the Mayonnaise itself is not good for health and its use must be minimized. 

So, here we are, let us start preparing Mayo Garlic Sauce with the name of ALLAH.


Equation:

  1.  Total time..............................10-15 minutes
  2.  Yield......................................Enough for 8-10 servings
  3.  Expenses..............................Rupees 150/00 to 200/00 (About One US Dollar)


INGREDIENTS FOR GARLIC SAUCE:

  1.  1 Cup Fresh Cream
  2.  1 cup Mayonnaise
  3.  1 to 2 Tablespoons Garlic Powder (According to your taste)
  4.  1/2 Teaspoon White Pepper
  5.  1 Tablespoon Sugar (Can be increased according to your taste)
  6.  1 Tablespoon Chicken Powder
  7.  2 Tablespoons Lemon Juice
  8.  Salt to taste
  9.  1 Teaspoon Dried Oregano


Method:

Mix all ingredients in a bowl, garnish with fresh coriander leaves or the green part of Spring Onion or fresh Coriander leaves.


Viewers and readers of my humble blog, I'd love to request you to please try making everything at your home by yourself to avoid getting malnutritious items from the market, especially for growing children who are always vulnerable to the glamour of advertisements and the commercialization of even the tiniest thing we are using in our kitchens. This is not rocket science that you are making your own homemade sauces, in fact, it is an achievement.
Please get rid of your FEAR OF FAILURE and start believing in yourself from now on. You can do everything which other people are doing.

Thank you, 

Love you all,

thine eternally,


NOVICE
 
Karachi, the 24th December 2021

Sunday 9 January 2022

BAINGAN ACHARI


BAINGAN ACHARI
Brinjal Curry in Pickle Spice


Introduction to Achar Masala :

This flashy vegetable is eaten around the world, in Europe, the Middle East, and in Asia is a commonly used vegetable. Baingan, Brinjal, Egg Plant or Aubergine.

In Sub-continent, the essence of a delectable meal is incomplete without that little tangy and spicy thing called “Achar (Pickle)”. Interestingly, when it comes to our Sub-continent culinary heritage, pickles happen to be a quintessential part of our traditional dishes. Our love for pickles can be defined by the plethora of variants we have! In fact, every region has a unique variant of pickle, which has some of the other nostalgia which redefines the culinary journey of that delight.
 
The most delicious thing about every pickle is the spices. Spices can turn any fruit or veggie into a lip-smacking and aromatic pickle. The enchanting aroma and drool-worthy taste can amp up any bland and boring meal. But what do you do with the masala, when the pickle is over? For most of us, the answer is that you, throw it!

Have you ever thought of reusing this delicious amalgamation of spices to make your meals interesting! Well, if you haven’t then we have got some great ideas for adding a twist of taste to your meals with the pickle masala.

We all know how delectable achari bhindi and Aaloo fries are! In fact, there’s no better side dish than the crispy achari bhindi or achari sabzi. Well, have you ever thought of making with just one or two spoons of masalas from your leftover pickle bottle? Well, try it this time and you will be happy with the taste!

Well, if you are a rice lover then this combination is a must-try. Just add some veggies and stir fry and add a spoonful of leftover pickle masala, stir the mixture well and add cooked rice. Your delicious achari rice is ready.

How about making your sandwiches interesting by spreading this delicious pickle masala as a spread and making delicious Indian Style sandwiches or idli sandwiches for that matter. To accentuate the taste of your sandwiches, you can mix this masala with some pudina chutney and top it with some tandoori paneer or chicken to woo your loved ones with a delicious homemade sandwich

Fond of homemade chutneys and instant condiments, then you simply reuse your achar masala to make it more delicious. Just make a puree of your favorite chutney, while tempering your chutney, just add a spoon of leftover pickle masala rather than using amchur powder(mango powder) and lime juice, just a spoonful masala is enough to amp up the taste.

Yes, now you can amp up the taste of your boring curries and sabzis by adding a twist of achar masala and making them so delicious. The mix of spicy and tanginess will make your meal experience so good.

Add it like a filling or mix it with the ingredients, you can make delicious samosas and kachoris with the leftover pickle masalas. Add it in stuffing or knead it like a dough. No matter, how you make your delicacies will taste heavenly.

Now you can turn your boring parathas interesting, with the leftover pickle masalas. Just mix and finely mash the veggies and add a spoonful of pickle masala and indulge in those achari parathas. You can also make parathas by mixing the leftover pickle masala, you just need to add a spoonful of masala while kneading the dough, it has the right amount of oil as well as spice to make crispy parathas


Equation:

Cleaning and cutting:                  10 minutes

Cooking:                                      20-25 minutes

yield:                                            Enough for 4 persons

Expenses:                                    Rupees 100 (less than a US Dollar)


Required Ingredients:

  1. Baingan (Brinjals) cut in slices                 1/2 Kg.
  2. Oil                                                             2-3 Tablespoons
  3. Goal Mirch (Button Chilies)                      4-5 or to taste
  4. Namak (Salt)                                             to taste
  5. Kalonji (Nigella Seeds)                             1/2 Teaspoon
  6. Saunf (Fenugreek Seeds)                        1/2 Teaspoon
  7. Ajwain (Carrom Seeds)                            1/2 Teaspoon
  8. Rai Dana (Mustard Seeds)                       1/2 Teaspoon
  9. Amchoor (Dried Raw Mango)                   2-3 pieces
  10. Nibu (Lemon) Juice                                  1Tablespoon
  11. Kuti Lal Mirch (Red Chili Flakes)              as per taste


How to cook:

  • Wash and cut the Brinjals in  round slices of your choice size
  • As the Brinjals tend to go blackish due to oxidization and to avoid that, put the cut Brinjals in saltwater for 10-15 minutes. 
  • Heat oil in a pan for about 3-4minute and then put in button chilies, Fenugreek seeds, Cumin seeds, and Mustard Seeds, stir for about a minute, and then add the Brinjal slices.
  • Add salt, red chili flakes, Carrom seeds, and Nigella Seeds (Kalonji). Cook for about 10-12 minutes on medium heat.
  • Now add dried raw mango slices and lemon juice and cook till Brinjals become tender.
  • Put on the lid tightly and lower the flame to produce steam.
  • Garnish with fresh Coriander leaves Julien cut ginger, and Green Chilies cut lengthwise.
  • Enjoy with Naan or Chapati.


I am sure that this recipe of Brinjals cooked in pickled spice will soon be on your dining table and you'll be enjoying this heavenly vegetable with family and friends and savoring the pickled spice taste at the same time. Get on with it without any FEAR OF FAILURE. Make it and break the taboo of ifs and buts. thinking of failure and facing others who might not approve of your effort. Just think of it, who they are to judge you and your skills? Why do people discourage others on their simple endeavors and think of themselves as trendsetters or Jack of all trades to point fingers at those who are not aggressive and who simply wanted to please them with their little efforts?

Please, don't listen to them, don't pay any heed to their sarcastic remarks. It is your life and nobody has a right of discouraging you and pinch you. they must mind their own business. You do yours. Let us throw away our FEAR OF FAILURE in the Dead Sea and enjoy our life to the fullest.


Love you all,

Thine Eternally


NOVICE


Sunday 2 January 2022

HAREY LAHSAN KE PARATHEY (Spring Garlic Parathey)


HAREY LAHSAN KE PARATHEY
(Spring Garlic Parathey)

(28.12.2020)


Introduction:


Spring Garlic or Green garlic is simply garlic that hasn’t fully matured. Green garlic is pulled from the ground before the clove and bulb skins dry out, so you might see green garlic at various stages of growth: with a barely discernible bulb (like a green onion), with a small bulb, but no clove separation (like a spring onion), or with a large bulb and cloves. This is a variety which gives not only aroma and taste but is very good for health as well. Here in Pakistan, it is mostly used in the Winter as its crops come in the winter, and enthusiasts of Spring Garlic like me wait for its harvest. It can be used in place of the traditional Garlic if we like its sweet.  It is mostly used in Parathas, especially in rural areas but now this traditionally rural delicacy is appearing in the Kitchens of the Urban society as well.  Pickle is also prepared from this species and presently people seem more inclined towards natural herbs for the cure of some chronic ailments, like Blood pressure, Heart disease, diabetes, etc. so they look towards these natural herbs more and this change of heart is beneficial for everyone.

I love Spring Garlic filled-in Parathas and pickles, both homemade. I also gift them to friends during Winter.

 sandwiches, Spring, or Green garlic can be used almost anywhere! Use it wherever you’d use regular bulb garlic or green onions, or use it in recipes specifically designed to highlight its unique mild garlic flavor. Add raw green garlic to salads, dressings, and sauces.  It may be used in Sandwiches, Empanadas, Soups, Chinese Rice,  and Pakoras, especially in the Sub-continent.

Spring garlic should be stored in the refrigerator, where it will keep for 5-7 days. Wrap it in a damp paper towel and place it in a plastic bag; or for a non-plastic alternative, stick it in a tall glass with some water in the bottom.  It can be frozen for use after the winter season ends, for freezing, chop it finely, the bulb and the shoots, all of it after washing it thoroughly. Put it in a plastic container or a bag and store it in the freezing section of your Refrigerator for months.

To prep, treat it like a small leek: trim off the very bottom (the roots are actually edible too, once the basal plate -- the part that holds the roots to the plant -- is removed), and use all of the tender white and light green parts. Dark green leaves can be saved for stock or used to add flavor to a soup (pop them in whole, like a bay leaf).

The Parathas turn heavenly if we use Desi Ghee (Clarified butter made directly from real Cow or Buffalo Milk at home without any artificial flavoring. 

Try it this winter season and for yourself, friends, and your family, they'll love it. So, let us start preparing for our Harey Lahsan Ke Parathay (Spring Garlic Parathas) in the name of ALLAH.


Equation:

  • Make and rest the Dough for                         30 minutes.
  • Cutting and mixing the Garlic & Filling          15 minutes
  • Frying the Parthas for                                    5 minutes for One Paratha
  • Preparing the Chutney                                  5-10 minutes
  • Yield.                                                              2 Parathas from the given quantity
  • Expenses                                                       Less than Rupees 100.                                                    


Ingredients Required For Paratha:

  1.  1/2 Cup Finely chopped Spring Garlic (Green Garlic)
  2.  2-3 Finely chopped Green chilies (or as per taste)
  3.  Salt to taste
  4.  1/2 cup Ghee
  5.  1/2 Lukewarm Water ( or as required)
  6.  1/4 Cup of Cooking Oil or Ghee and some more of the same for frying the Parathas.
  7.  2 Cups Aatta (Wheat Flour)


Method:

  •  In a large bowl mix together wheat flour, salt, and ghee, and then start adding lukewarm water gradually and slowly and start kneading to form a dough.
  •  When the dough is formed, let it rest for 25-30 minutes to mature.
  •  Mix together Finely chopped Spring Garlic, Green Chilies, and Salt in a small bowl and set aside.
  •  Take the bowl of dough and knead the dough again with wet hands on the counter or any of your work surfaces.
  •  Take a ball or portion of the dough and roll it on the surface, dusted with the dry flour.
  •  Make a round disc (roti) of the size of your choice and apply some Ghee or oil to it.
  •  Sprinkle some dry flour over the Ghee or Oil on the roti.
  •  Now apply Garlic mixture over the floured Roti and with the help of fingers or spatula,   spread it evenly on the entire Roti and fold it in half like English Capital D.
  •  Make vertical cuts in this D (See Picture) and roll it into a log or a thick Rope. (See   Picture) and shape this Rope or Log like a Snake or Pinwheel.
  •  Rest this Snake for 5-10 minutes.
  •  Now press down this Pinwheel or Snake with your hands and roll it again to make a   Roti. 
  •  The above process will make the Paratha  Crisp and Flakey.
  •  Heat a  Tawa (griddle) with a little oil and fry the Paratha. 
  •  Fry till it turns Golden on both sides.


Ingredients for Chutney:

  1.   1/2 Cup Finely chopped Spring Garlic
  2.   Finely chopped Green Chilies as per taste
  3.   1/2 Cup Finely chopped fresh Coriander leaves
  4.   1-inch piece of fresh Ginger
  5.   2-3 Tablespoons Lemon Juice
  6.   Salt to taste
  7.   Water as required
  8.   Use lukewarm water


Method for Chutney:

  •  Grind & blend all the ingredients in a Grinder /Blender, adding water till your desired consistency is achieved.


So, how are the Parathas, we just prepared? Of course, these are tasty and make one need more.  and believe me, when you'll start making it, you'll find it very interesting as well as challenging and I am sure you'll never stop completing it without a frown. It will be a great achievement and satisfaction for your Culinary capabilities and a matter of pride. The only thing that makes a person hesitate in going to making these parathas is the FEAR. FEAR OF FAILURE, with ifs and buts. Don't forget if you fail in achieving the desired result on your first try, it will not make you a laughing stock, because even renowned Chefs have gone through this failure when they were juniors and were learning the art. so, Just kick out this so-called FEAR OF FAILURE from your mind and thoughts.  Turn it into a tonic that boosts your efforts to reach the intimate goal of success. Also remember, failure makes you try and try again, don't forget you've achieved the result on your first or second try which the Professional Chefs have achieved after taste and toils and pouring sweats in the kitchen along with frowns and reprimands of the Seniors. DO IT, JUST DO IT.

thanks,

Thine eternally,


NOVICE